Send and Read Emails with Gmail API
Gmail is one of the most popular email services so far, and you will very probably want to use it as a mailbox for your web or mobile app.
Gmail API – why you should consider using it
The API provides you with a RESTful access to the features you usually have with Gmail:
- Send and receive HTML emails
- Send and receive emails with attachments
- CRUD (create, read, update, and delete) operations with messages, drafts, threads, and labels
- Access control of your Gmail inbox
- Full search capabilities of the web UI
- Perform specific queries
- And many more features…
Developers loves to use the Gmail API because it’s easy to implement. Also, you can use this option for versatile cases like:
- automated email sending
- mail backup
- mail migration from other email services
In this blog, we will learn about the Gmail API using python.
Resource types and methods
With Gmail API, you can deal with several resource types and manage them using the following methods:
1. Draft
- create (creating a new draft) an unsent message that you can modify once created
- delete (removing the specified draft)
- get (obtaining the specified draft)
- list (listing drafts in the mailbox)
- send (sending the specified draft according to the To, Cc, and Bcc headers)
- update (updating the specified draft’s content)
2. Message
- batchDelete (removing messages by message ID) an immutable resource that you cannot modify
- batchModify (modifying labels on the specified messages)
- delete (removing the specified message)
- get (obtaining the specified message)
- import (importing the message into the mailbox (similar to receiving via SMTP))
- insert (inserting the message into the mailbox (similar to IMAP)
- list (listing messages in the mailbox)
- modify (modifying labels on the specified message)
- send (sending the specified message according to the To, Cc, and Bcc headers)
- trash (transferring the specified message to the trash)
- untrash (transferring the specified message from the trash)
3. Thread
- delete (removing the specified thread) a collection of messages within a single conversation
- get (obtaining the specified thread)
- list (listing threads in the mailbox)
- modify (modifying labels in the thread)
- trash (transferring the specified thread to the trash)
- untrash (transferring the specified thread from the trash)
4. Label
- create (creating a new label) a resource to organize messages and threads (for example, inbox, spam, trash, etc.)
- delete (removing the specified label)
- get (obtaining the specified label)
- list (listing labels in the mailbox)
- patch (patching the specified label) – this method supports patch semantics
- update (updating the specified label).
5. History
- list (listing the history of all changes to the mailbox) a collection of changes made to the mailbox
6. Settings
- getAutoForwarding (auto-forwarding setting) setting up Gmail features
- updateAutoForwarding (updating the auto-forwarding setting)
- getImap (IMAP settings)
- updateImap (updating IMAP settings)
- getLanguage (language settings)
- updateLanguage (updating language settings)
- getPop (POP3 settings)
- updatePop (updating POP3 settings)
- getVacation (vacation responder settings)
- updateVacation (updating vacation responder settings)
Steps to make your app able to send emails with Gmail API.
Step 1: Create a project at Google Cloud Console.
If you want to have access to your Gmail from your mobile or web app, you should start with Google Developers Console. Those who visit this page for the first time ever will have to agree with the Terms of Service and pick their Country of residence. Then click Select a project and create a new one.
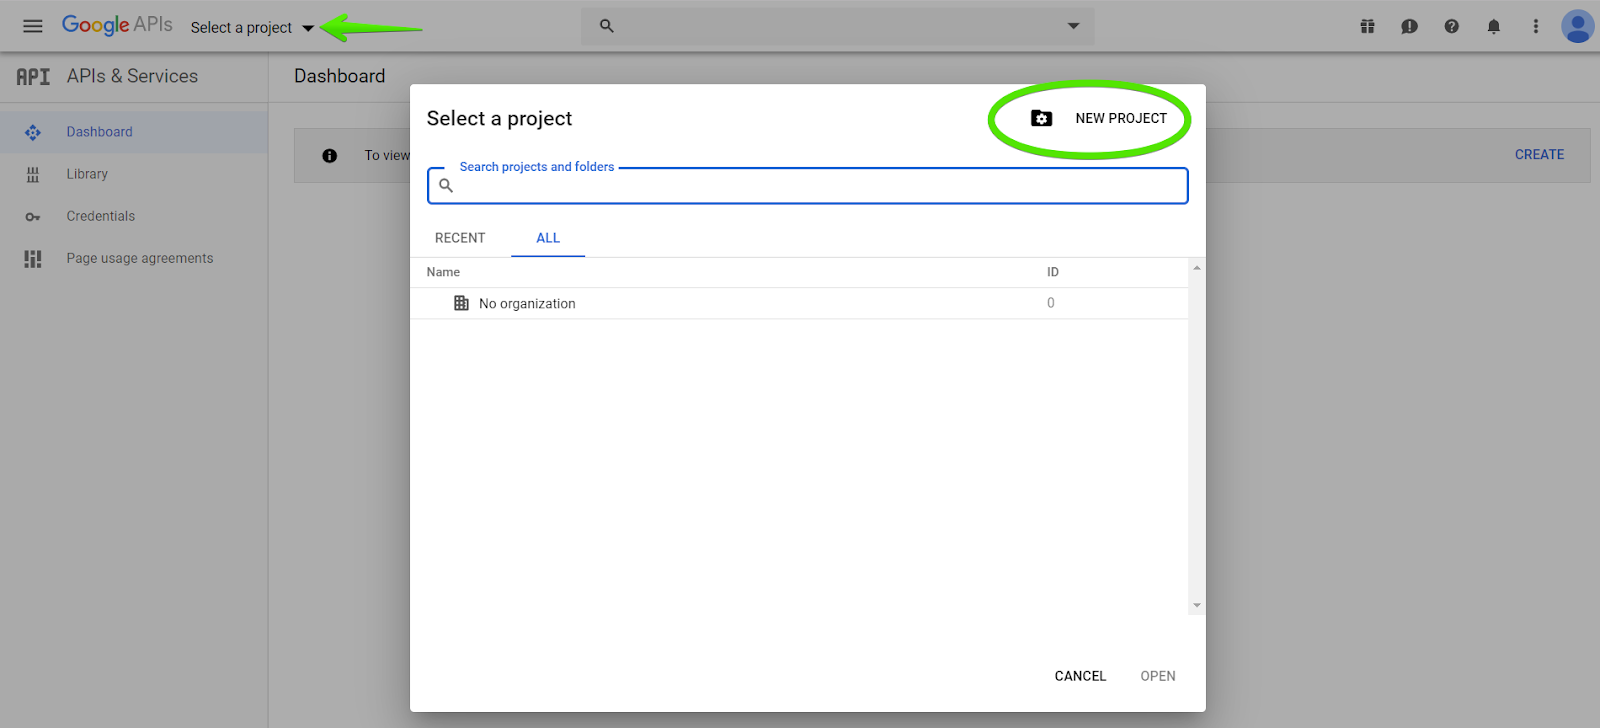
Name your new project and press Create at the bottom.
Step 2: Enable Gmail API
Once project created successfully, Go to the Library tab on the left and find yourself in the API Library page. Enter “Gmail API” in the search bar and click on it once found. Now, you need to enable the API for your project.
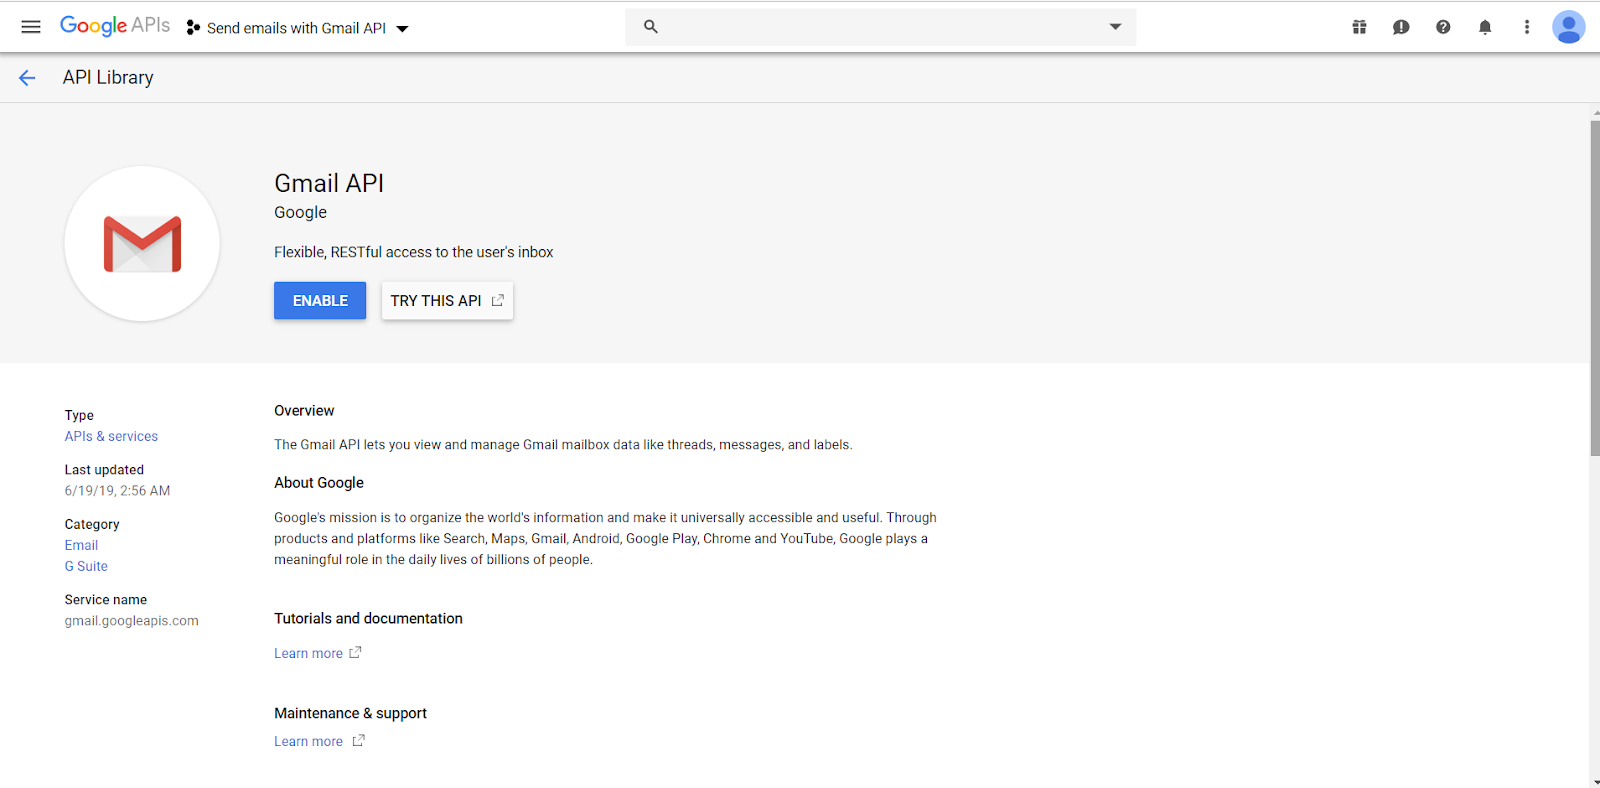
Note that you’ll have to enable it separately for each new project you work on.
Step 3: Credentials and authentication with OAuth 2.0
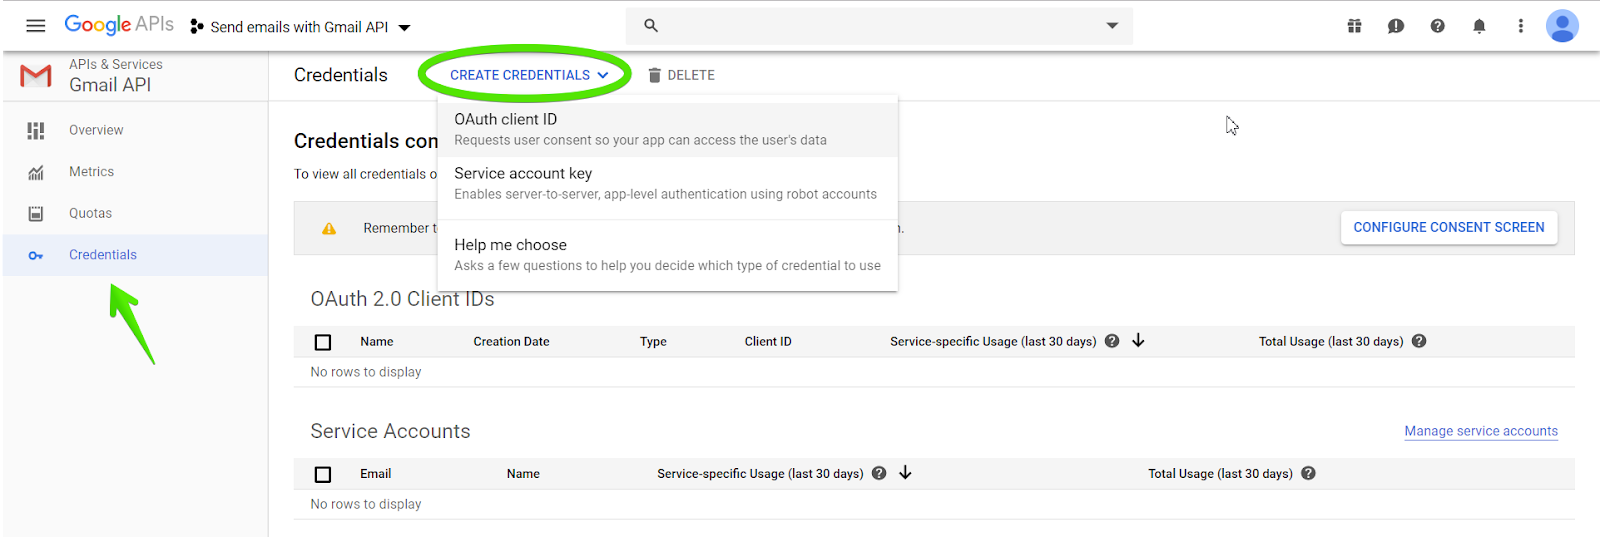
Once the API is enabled, you’ll be taken to a nice dashboard that says, “To use this API, you may need credentials”. If you click Create credentials, you’ll have to pass through a set of questions to find out what kind of credentials you need.
Let’s do this with the simple way using OAuth client ID. So, click the Credential tab on the left, and then pick OAuth client ID from the drop-down list of the Create Credentials button.
You’ll see the Configure consent screen button. It will bring you to a page with many fields. You can just enter the name of your app and specify authorized domains. Fill in other fields if you want.
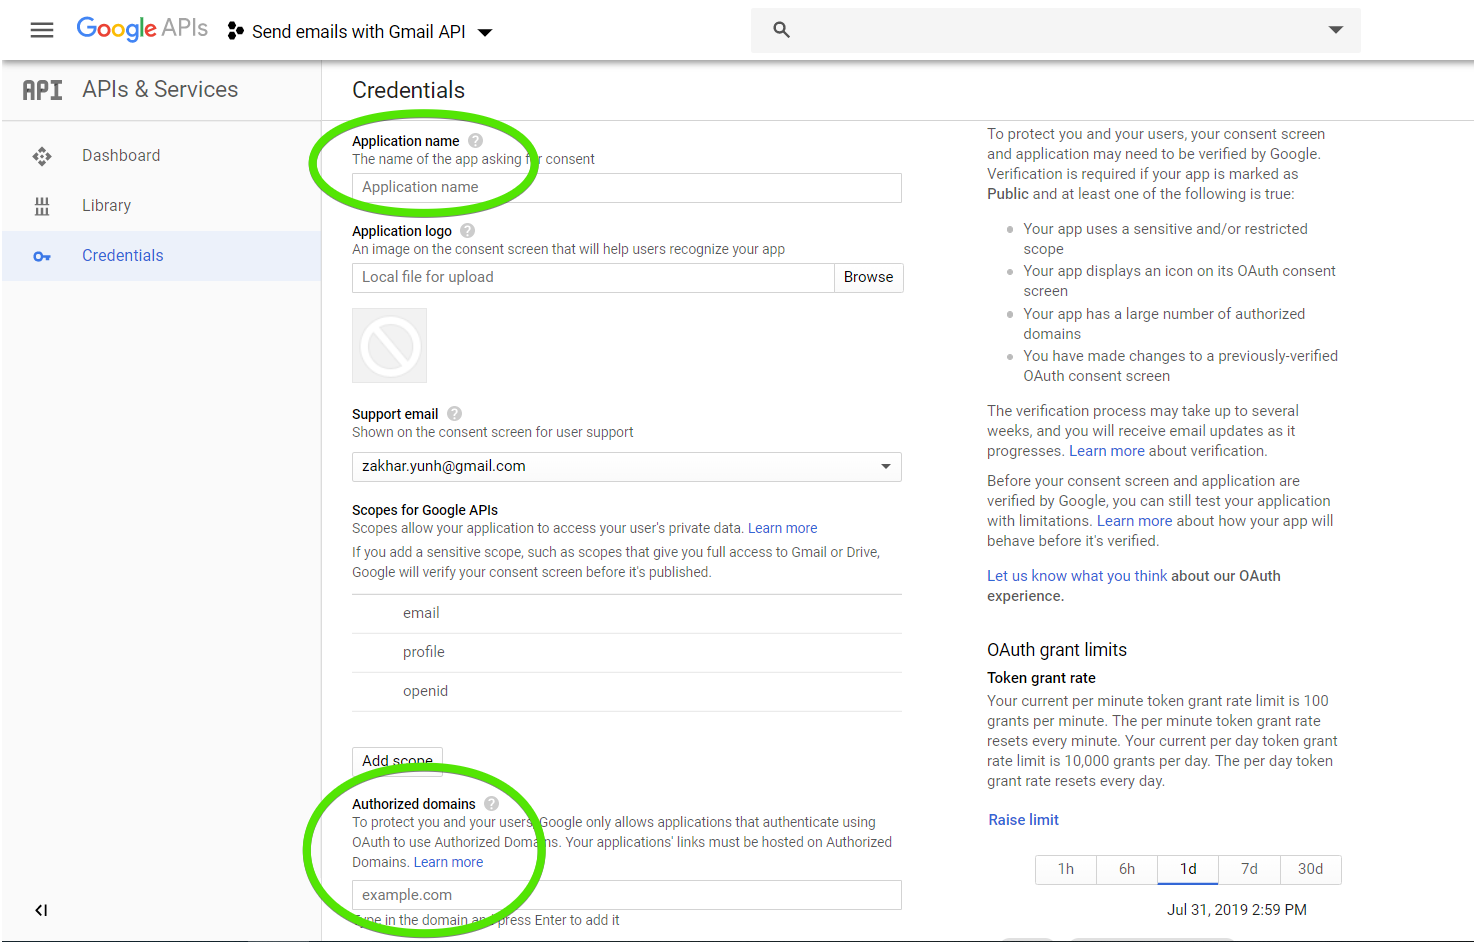
Click save and then pick the type of your app (web app, Android, Chrome App, iOS, or other). After that, name your OAuth Client ID. Also, enter JavaScript origins and redirect domains for use with requests from a browser or a web server respectively. Click create to finalize. That’s it. Download a JSON file with your credentials – you’ll need it later.
Step 4: Pick a QuickStart guide
The next step is to select a QuickStart guide according to the technology your app is built with. So far, there are the following options:
If you are looking for other libraries, you can find here
For mobile apps, there are G Suite APIs for iOS and Android as well.
In this blog, we will implement Gmail API using python library.
Step 5: API client library
Google provides different client libraries to work with the API:
Installation: API client for Python
pip install --upgrade google-api-python-client google-auth-httplib2 google-auth-oauthlib
or
easy_install --upgrade google-api-python-client google-auth-httplib2 google-auth-oauthlib
Step 6: Access to Gmail Account
In this step, we need to authorize access to your Gmail account from the app, and then you’ll be able to manage emails. For this, you need to create a file in your working directory. Below you’ll find the specific file names for each technology. Copy-paste a corresponding code sample from the chosen Quickstart Guide and run it. Here are the links to the code samples:
Python
- Filename: quickstart.py
- Directory: gmail/quickstart/
- Code sample for Python
- Run with: python quickstart.py
It worked or not. Google will warn you about a probable failure of the sample you run to open a new window in your default browser. If this happens, you’ll need to do it manually. Copy the URL from the console and paste it in the browser. It will look like this:

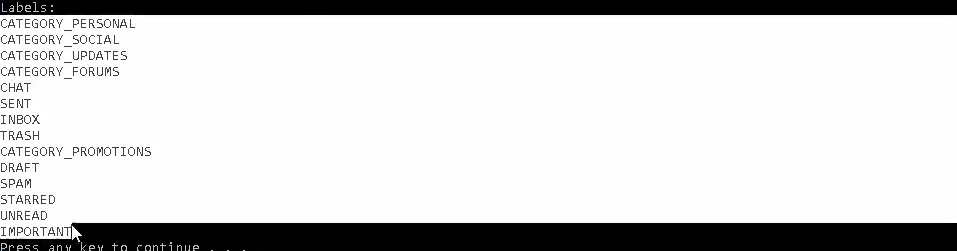
Next, you’ll be asked to either log into your Google account or select one account for authorization. Press allow and you’ll see all your inbox labels in the SSH shell like this:
Congrats! Gmail API works and you can send your first email.
Step 7: Create an email
To send a message, first you need to create one. For this, your app can use the drafts.create method which includes:
- Creation of a MIME message
- Conversion of the message into a base64url encoded string
- Creation of a draft
Let’s see how this is done in practice with Python:
First import some necessary modules:
importbase64
importmimetypes
importos
from email.mime.audioimportMIMEAudio
from email.mime.baseimportMIMEBase
from email.mime.imageimportMIMEImage
from email.mime.multipartimportMIMEMultipart
from email.mime.textimportMIMEText

from api.client import errors
def create_message(sender, to, subject, message_text):
  message = MIMEText(message_text)
  message['to'] = to
  message['from'] = sender
  message['subject'] = subject
  raw_message = base64.urlsafe_b64encode(message.as_string().encode("utf-8"))
  return {
    'raw': raw_message.decode("utf-8")
  }


def create_draft(service, user_id, message_body):
  try:
    message = {'message': message_body}
    draft = service.users().drafts().create(userId=user_id, body=message).execute()

    print("Draft id: %s\nDraft message: %s" % (draft['id'], draft['message']))

    return draft
  except Exception as e:
    print('An error occurred: %s' % e)
    return None
Step 8: Send an email
Once you have created your message, you can either call messages.send or drafts.send to send it. Here is how it may look:
def send_message(service, user_id, message):
  try:
    message = service.users().messages().send(userId=user_id, body=message).execute()
    print('Message Id: %s' % message['id'])
    return message
  except Exception as e:
    print('An error occurred: %s' % e)
    return None
Step 8.1: Send an email with attachments
You can also create and send a multi-part MIME message. For example, this is how it looks with Python:
def send_message(service, user_id, message):
  try:
    message = service.users().messages().send(userId=user_id, body=message).execute()

    print('Message Id: %s' % message['id'])

    return message
  except Exception as e:
    print('An error occurred: %s' % e)
    return None


def create_message_with_attachment(sender, to, subject, message_text, file):
  message = MIMEMultipart()
  message['to'] = to
  message['from'] = sender
  message['subject'] = subject

  msg = MIMEText(message_text)
  message.attach(msg)

  content_type, encoding = mimetypes.guess_type(file)

  if content_type is None or encoding is not None:
    content_type = 'application/octet-stream'

  main_type, sub_type = content_type.split('/', 1)

  if main_type == 'text':
    fp = open(file, 'rb')
    msg = MIMEText(fp.read().decode("utf-8"), _subtype=sub_type)
    fp.close()
  elif main_type == 'image':
    fp = open(file, 'rb')
    msg = MIMEImage(fp.read(), _subtype=sub_type)
    fp.close()
  elif main_type == 'audio':
    fp = open(file, 'rb')
    msg = MIMEAudio(fp.read(), _subtype=sub_type)
    fp.close()
  else:
    fp = open(file, 'rb')
    msg = MIMEBase(main_type, sub_type)
    msg.set_payload(fp.read())
    fp.close()
  filename = os.path.basename(file)
  msg.add_header('Content-Disposition', 'attachment', filename=filename)
  message.attach(msg)

  raw_message = base64.urlsafe_b64encode(message.as_string().encode("utf-8"))
  return {'raw': raw_message.decode("utf-8")}
Get All Emails
Read all email from your gmail inbox using python
import base64
import email

def get_messages(service, user_id):
  try:
    return service.users().messages().list(userId=user_id).execute()
  except Exception as error:
    print('An error occurred: %s' % error)
Step 9: Read an Email
Read a specific email from your gmail inbox using python
It would be weird if you can’t use the API to read messages from Gmail. Luckily you can by using the get method by the message ID. Here is how it may look in a Python app:
import base64
import email

def get_messages(service, user_id):
  try:
    return service.users().messages().list(userId=user_id).execute()
  except Exception as error:
    print('An error occurred: %s' % error)


def get_message(service, user_id, msg_id):
  try:
    return service.users().messages().get(userId=user_id, id=msg_id, format='metadata').execute()
  except Exception as error:
    print('An error occurred: %s' % error)


def get_mime_message(service, user_id, msg_id):
  try:
    message = service.users().messages().get(userId=user_id, id=msg_id,
                                             format='raw').execute()
    print('Message snippet: %s' % message['snippet'])
    msg_str = base64.urlsafe_b64decode(message['raw'].encode("utf-8")).decode("utf-8")
    mime_msg = email.message_from_string(msg_str)

    return mime_msg
  except Exception as error:
    print('An error occurred: %s' % error)
Get Attachments in Gmail API
If the message contains an attachment, expand your code with the following:
def get_attachments(service, user_id, msg_id, store_dir):
  try:
    message = service.users().messages().get(userId=user_id, id=msg_id).execute()

    for part in message['payload']['parts']:
      if(part['filename'] and part['body'] and part['body']['attachmentId']):
        attachment = service.users().messages().attachments().get(id=part['body']['attachmentId'], userId=user_id, messageId=msg_id).execute()

        file_data = base64.urlsafe_b64decode(attachment['data'].encode('utf-8'))
        path = ''.join([store_dir, part['filename']])

        f = open(path, 'wb')
        f.write(file_data)
        f.close()
  except Exception as error:
    print('An error occurred: %s' % error)
Marking Emails as Read
def mark_as_read(service, user_id, query):
    messages_to_mark = search_messages(service, query)

    print(f"Total Matched emails: {len(messages_to_mark)}")

    return service.users().messages().batchModify(
      userId=user_id,
      body={
          'ids': [ msg['id'] for msg in messages_to_mark ],
          'removeLabelIds': ['UNREAD']
      }
    ).execute()
We have used the batchModify() method, and we have setted removeLabelIds to ["UNREAD"] in the body parameter to remove the unread label from the matched emails.
For example, let’s mark all Google emails as read:
mark_as_read(service, "me", "Google")
Marking Emails as Unread
Marking messages as unread can be done in a similar manner, this time by adding the label ["UNREAD"]:
def mark_as_unread(service, user_id, query):
    messages_to_mark = search_messages(service, query)

    print(f"Matched emails: {len(messages_to_mark)}")

    # add the label UNREAD to each of the search results
    return service.users().messages().batchModify(
        userId=user_id,
        body={
            'ids': [ msg['id'] for msg in messages_to_mark ],
            'addLabelIds': ['UNREAD']
        }
    ).execute()
Example:
mark_as_unread(service, "me", "from: example@domain.com")
Deleting Emails
def delete_messages(service, user_id, query):
    messages_to_delete = search_messages(service, query)

    # it's possible to delete a single message with the delete API, like this:
    # service.users().messages().delete(userId=user_id, id=msg['id'])
    # but it's also possible to delete all the selected messages with one query, batchDelete

    return service.users().messages().batchDelete(
      userId=user_id,
      body={
          'ids': [ msg['id'] for msg in messages_to_delete]
      }
    ).execute()
This time we are using the batchDelete() method to delete all matched emails.
Example, delete all Google Alerts emails:
delete_messages(service, "me", "Google Alerts")
Usage Limits / Rate Limits / API Limits
Quota
Doc: https://developers.google.com/gmail/api/reference/quota
The usage limit of Gmail API is one billion quota units per day. Each method requires a particular number of quota units.
For example, a drafts.create is 10 units and a messages.send is 100 units.
Gmail API enforces standard daily mail sending limits. Also, keep in mind that the maximum email size in Gmail is 25MB.
The Gmail API is subject to a daily usage/rate limit, that applies to all requests made from your application, and per-user rate limits. Each limit is identified in terms of quota units, or an abstract unit of measurement representing Gmail resource usage.
The following table details the main request limits:
| API limit type | Limit |
|---|---|
| Daily usage | 1,000,000,000 quota units per day for your application. |
| Per user rate limit | 250 quota units per user per second, moving average (allows short bursts). |
Per-method quota usage
The number of quota units consumed by a request varies depending on the method called. The following table outlines the per-method quota unit usage:
| Method | Quota Units |
|---|---|
| drafts.create | 10 |
| drafts.delete | 10 |
| drafts.get | 5 |
| drafts.list | 5 |
| drafts.send | 100 |
| drafts.update | 15 |
| getProfile | 1 |
| history.list | 2 |
| labels.create | 5 |
| labels.delete | 5 |
| labels.get | 1 |
| labels.list | 1 |
| labels.update | 5 |
| messages.attachments.get | 5 |
| messages.batchDelete | 50 |
| messages.delete | 10 |
| messages.get | 5 |
| messages.import | 25 |
| messages.insert | 25 |
| messages.list | 5 |
| messages.modify | 5 |
| messages.send | 100 |
| messages.trash | 5 |
| messages.untrash | 5 |
| settings.delegates.create | 100 |
| settings.delegates.delete | 5 |
| settings.delegates.get | 1 |
| settings.delegates.list | 1 |
| settings.filters.create | 5 |
| settings.filters.delete | 5 |
| settings.filters.get | 1 |
| settings.filters.list | 1 |
| settings.forwardingAddresses.create | 100 |
| settings.forwardingAddresses.delete | 5 |
| settings.forwardingAddresses.get | 1 |
| settings.forwardingAddresses.list | 1 |
| settings.getAutoForwarding | 1 |
| settings.getImap | 1 |
| settings.getPop | 1 |
| settings.getVacation | 1 |
| settings.sendAs.create | 100 |
| settings.sendAs.delete | 5 |
| settings.sendAs.get | 1 |
| settings.sendAs.list | 1 |
| settings.sendAs.update | 100 |
| settings.sendAs.verify | 100 |
| settings.updateAutoForwarding | 5 |
| settings.updateImap | 5 |
| settings.updatePop | 100 |
| settings.updateVacation | 5 |
| stop | 50 |
| threads.delete | 20 |
| threads.get | 10 |
| threads.list | 10 |
| threads.modify | 10 |
| threads.trash | 10 |
| threads.untrash | 10 |
| watch | 100 |